
Are you one of those people who must put your creative stamp on everything, including notebooks? If so, try one of these easy DIY ideas to decorate your notebooks and upgrade them from boring to fabulous.
Add a touch of class with terrazzo-inspired paper. Simply cut a piece of paper 1-inch smaller on all sides than the notebook cover base and glue it on.
Glue Pictures
One of the simplest ways to decorate a notebook cover is to glue pictures on it. This is an especially good idea for kids who are using the notebooks for school. They can draw pictures to represent the subjects they study, such as a globe for geography or a paintbrush for art. Then the notebook will look like an interesting piece of artwork instead of just a boring notebook.
Another easy way to decorate a notebook is to use stickers. Stickers come in a wide variety of shapes, colors and themes. Choose ones that match your personality or the purpose of the notebook. Then apply them to the notebook cover, arranging them neatly so that they are evenly spaced across the surface. You can also get sticker borders or accents from scrapbook supply companies that you can glued to the edges of the notebook.
You can also turn a notebook into a journal by covering it with old magazine clippings. This is a great idea for both children and adults. It’s a simple, inexpensive way to make your notebooks more interesting and unique.
You can also add a touch of flair to your notebook by adding puffy paint dots. This is a fun project for kids, and it’s a great way to recycle some of that extra patterned fabric you have.
Glue on Other Accessories
Decorative stickers can give any notebook a fun look, and they are easy to find at the dollar store. Choose symbols that represent the purpose of the notebook, such as a globe for geography or a paintbrush for art. Then paint over the stickers with acrylic paint for an attractive, durable finish.
If you don’t want to cover your entire notebook with stickers, try painting the covers instead. This is a great way to get rid of old, unwanted journals. Just make sure to use a waterproof paint and protect the pages from water damage.
You can also decorate a notebook with pieces of fabric. This is a great project for recycling scrap fabrics, such as the last few inches of an old piece of embroidered linens you couldn’t bear to toss. You can even use old T-shirts to create a unique, colorful notebook cover.
If you have a Cricut or another type of vinyl cutter, you can cut a custom design from self-stick vinyl and apply it to your notebook cover. This is an especially good choice if your journal has a plastic cover. You can then write on the surface with permanent markers or use chalkboard paint to personalize your notebook. If you don’t have a Cricut, you can still apply a design with a hot glue gun or liquid glue.
Paint It
If you’re not a fan of stickers, or just want to make your notebook look unique, paint the cover with acrylic paint. You can use a bright color or a more muted one to complement the motifs on the inside pages. For instance, if your notebook is for school, choose a symbol that represents the subject you’re studying. For example, a globe for geography or a paintbrush for art.
If the book cover is printed, start with white acrylic paint or a light color that will cover it well. Then, apply a few coats of the color you want, waiting for each coat to dry thoroughly. If you’re not an experienced painter, try using stencils to keep your work neat and tidy.
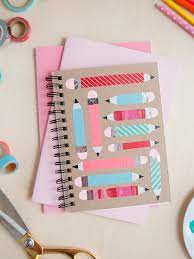
Another option is to cover the notebook with washi tape. This is a quick and easy way to make the cover look pretty, and it’s also great for wrapping matching pencils.
If you’re not a talented artist but still want your notebook to look nice, apply a light coating of Amy Howard clear wax over the painted book cover. This makes the book feel luxurious and gives it a sheen that will last. It will also prevent spills from soaking in and staining the book. It’s perfect if you’re giving your notebook as a gift.
Mod Podge It
Whether you have a die cut overlay or are decorating a simple notebook cover, Mod Podge is the perfect finishing touch. It seals everything down and helps prevent wrinkling. For this project you’ll need a foam brush and some paper that matches your cover. If you’re unsure what color Mod Podge to use, try using the same one as your base (we used #8 here). You can also use a paper cutter to trim out your notebook cover.
Start with a layer of background paper, trimming it to be just a little larger than the book. Then, with the brush and a small amount of Mod Podge, place your paper on the book, smoothing it out.
The next layer is your magazine cuttings. They don’t have to be specific, but it’s helpful to choose ones that have straight edges so they’ll line up with the edge of your cover. Brush more Mod Podge over the cuttings and let it dry before adding your next layer of paper.
Finally, add some wash tape. You can make it any color or style you want to match your notebook cover. Tear a piece of tape that’s a bit longer than your notebook and carefully line it up with the edge of your cover. Smooth it down and allow it to dry completely before writing or sketching in your new journal.